HWFF Coating Systems
Using All Purpose Foam Coat
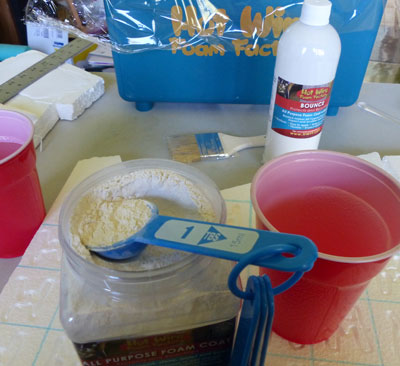
What is All Purpose Foam Coat? This is a powdered product, specially developed by Hotwire Foam Factory, to form a tough coating for your foam projects. There are a wide variety of methods for mixing and applying the product:
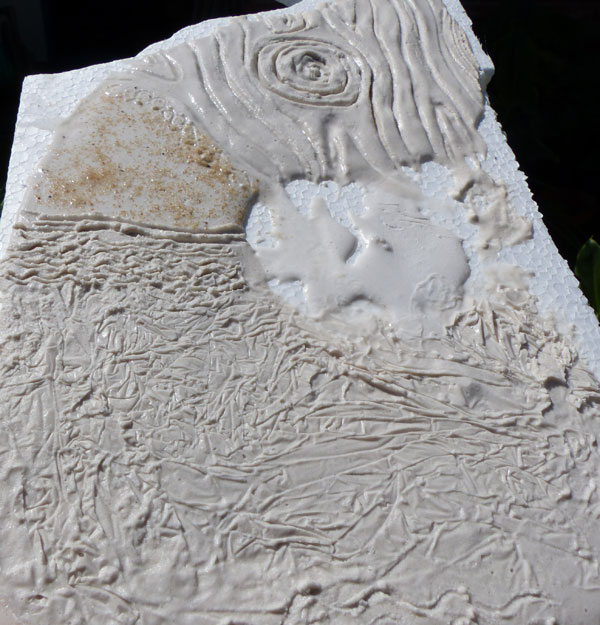
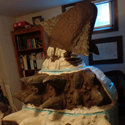
 When mixed with water and applied thickly to EPS foam, it makes the project very strong, so that it can be handled without denting or breaking. While still wet, it can be textured to look like wood, stone, tree bark, brushed animal fur, and so on (limited only to your imagination and texturing skills.) See some of the projects listed below in our gallery for examples and ideas!
- When mixed with Boost (a liquid fortifier) it is even stronger. It can be applied thinly to create a very strong, but lightweight coating for your project. This is especially useful if you are making a large item that is part of a costume, for example. It can be applied in a thick layer for more protection. (Note: to make the finished product waterproof, coat the project with a waterproofing coating and/or paint.) Mix Boost with equal parts water (or more water, depending on your goals.) Use up to 8oz. of the Boost/water mix with 1.5 to 5 lbs. of All Purpose Foam Coat. Note: you will not be able to sand your project when dry if you add Boost. You will not be able to clean your tools if you allow this mixture to dry on the tools. (Boost is hard and sticks to everything!)
- When mixed with Bounce (a liquid rubberizer) it can be used as a thin coating that lends strength and protection, while keeping the project lightweight. However, with a light coat, the surface can be punctured, so if you need a more durable coating use more foam coat, less Bounce, and apply it thickly. Use 8 oz. Bounce with 1.5 to 5 lbs. of All Purpose Foam Coat.
- When mixed with Grit (a specially engineered white rock grain with angular edges used to strengthen the foam coat) it can be used to create a rougher texture, similar to rock or concrete. This can also be mixed with All Purpose Foam Coat and Boost. Use up to 1 part Grit with 2 parts All Purpose Foam Coat.
How do I apply All Purpose Foam Coat? This is one of our easiest products to use and apply! Of course, you must first have decided on how you want to mix it, depending on your project goals (see list above.) You must decide what textures you wish to create. And, you should create a test application before you commit to coating your masterpiece, whatever it might be. Here are the basic steps:
- 1. Begin your project with testing. Mix a small amount of the All Purpose Foam Coat: (a) with water; or (b) with or without Grit and with Boost and water; or (c) with Bounce (no water added). In a small container put the liquid, then add the dry mixture (Foam Coat/Foam Coat with Grit), mixing thoroughly. Keep track of the exact amounts used in your test. Add more dry mix to make the mixture thick, or more liquid mix to make it thin. Mix completely but quickly and then apply it to your test surface with a trowel, paint brush or other tool. If your goal is a very smooth finish, tap the coated object gently to “settle” the finish. WEAR A DUST MASK and GLOVES.
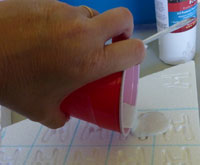
- 2. While still wet, but slightly set, you can test your texturing. You will have time to wash your brushes, containers and tools while you wait for the mixture to set up a bit. All products listed clean up with water. Here are some examples of how to texture:
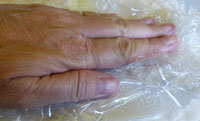
- –Use plastic wrap over a thick coat and “squish” the wrap into the coating to create an interesting texture.
- –Use clay-working or paint-texturing tools to create wood grain.
- –Sprinkle some Grit on the surface to create a texture. Sprinkle any other shapes or objects you want on the surface to create additional texture
- –Use plastic wrap over a thick coat and “squish” the wrap into the coating to create an interesting texture.
- 3. Didn’t get what you wanted? Try again, making the mixture thicker or thinner, texturing sooner or later, or layering the products (such as a thin layer of All Purpose Foam Coat with Boost followed by a layer of All Purpose Foam Coat with water, or any of our other foam coat products), adding the second layer once the first layer is dry.
- 4. Now you know your mixture. Multiply the amounts used in the test to determine the amount for the project’s coating. Plan on coating one side at a time, and turning the object around to coat another side after this is fully dried. Do NOT mix larger quantities than you can apply in about 10 minutes, as the mixture will begin to set and the application will not look the same everywhere. Apply quickly and evenly. Depending on the mixture and surface, you might pour it from your container directly on the project and smooth with a brush or other tool.
- 5. Now, finish your project. Use a sealant, if desired, and paint. You can use any acrylic paint; if color fastness is needed, make sure you use paint that has high ratings for color fastness. Exterior house paints are a good product for many of your projects. For fine art projects you might want to use a coating over the paint to protect from light or water and cleaning damages.
Some examples of projects using All Purpose Foam Coat in our Gallery:
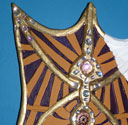 Cosplay Shield