How To Make Barriers for Terrain
By Andrew Wycherley of Wargames Scenery World
www.wargamessceneryworld.com
With the 8th edition of the Warhammer fantasy battle rules, terrain moved a bit more centre stage with many specific types of terrain mentioned. One of these is barriers – which are very useful things to have around anyway, given the cover they provide for troops behind them. With that in mind, I thought some straight forward barriers would be of use. There are many ways you can make barriers, from stone walls, to hedges, to fences and so on. I decided to go for rendered walls, in other words, something that could respresent plastered brick or cob walls. I also decided to make a number of straight walls, plus some right angled corners as this would give a lot of flexibility in setting them up on the table.
You will need:
- A sheet of 1″ thick polystyrene foam, either the expanded (beaded) type as I used, or the more expensive (but better) extruded type.
- Ideally a hot wire cutter to cut the polysterene.
- Some household filler – I find the brush on hairline crack filler is ideal.
- Basing material – you can use MDF (best), hardboard (good) or cardboard (OK). Hardboard and cardboard are easiest to work with.
- Paints – an undercoat colour, base coat and top coat for dry brushing. You can use a wash too if you like.
- Flock / static grass / reindeer moss / sand / gravel – or whatever else you like to finish the bases.
- Paintbrushes, a cutting mat, PVA (white) glue, etc.
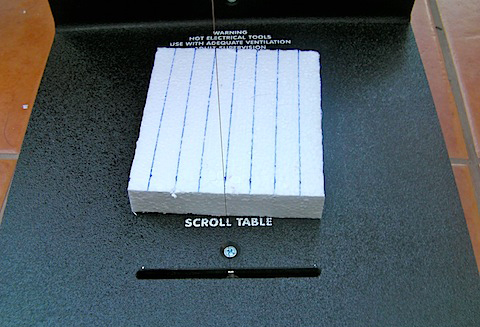 Mark out on your polystyrene foam suitable lengths and widths for your wall(s). If you want them to be less than 1″ tall, you can always cut them down after they have been cut out. Cut out each individual wall section and then repeat the process for the corner pieces. As you can see, I used my Hot Wire Foam Factory Scroll Table foam cutter, which makes this quite easy to do.
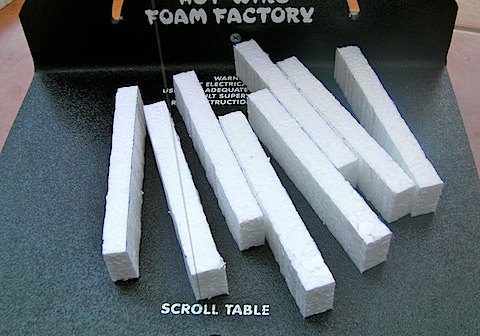
 Cut out your basing material and glue the foam walls to it. I made the bases very small and finished them at the ends of the walls so they didn’t overlap. This makes it easier to butt up the sections of wall together, giving you great flexibility when setting out terrain on your table.
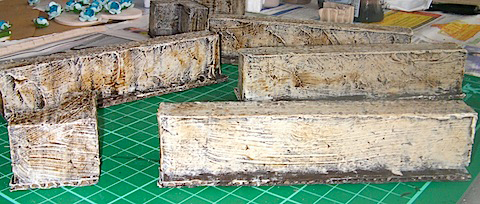
 Next, it is time to texture the walls. Depending on what you want to represent, there are a number of ways you can do this. You can use paint that already has texture medium in it, you can coat the polystyrene with PVA glue and then sand if you are going for a stone finish (if you are doing this, you will want to cut some stone blocks lines into the surface of the foam, a biro is ideal for this). In my case, to get the rendered effect, I went for some brush on Polyfilla hairline crack filler. You could use any household decorators filler, but you may need to thin it with a little water first. I applied the filler using a brush, being careful to cover all the polystyrene. You can use the brush marks to your advantage if you like, making it seem like roughly applied plaster or maybe the earth surface of a cob wall.

Once the filler is dry, you can start the painting process. I applied two coats of a dark brown acrylic paint by brush, but you could use spray paint if you have covered all the foam – polystyrene is melted by many spray paints. Once the base coast was dry, I applied a heavy dry brush of Games Workshop bleached bone, as I wanted a pale cream look that had been weathered over the years and also got covered in mud – the dark brown showing through worked well for this. To enhance the effect I applied an overall Games Workshop Devlan mud wash, followed by heavy patches of wash only in some places.
 I then finished the bases off with some of various Javis flocks and patches of static grass. I painted the bases with PVA and applied the flock / grass to this. I also put small amounts of the grass on odd places on the walls themselves to look like grasses were growing out of them. Finally I glued some reindeer moss on as bushes up against some of the walls. It may look like there is a bit of a mix of different flocks being used (because there is!) but I was just experimenting to see what they all looked like.
 You can of course go as wild as you like here – its always good to raid the bits box and add a few items to dress your scenery with, such as a shield and spear leaning against the wall. Little touches like this make all the difference. So there you have it, a quick and simple way to make a flexible set of walls as barriers for your Warhammer Fantasy games. The picture below shows some of the walls in use with a simple barn / hovel I made in the same style (how to post coming soon) , making a little farmstead, such as you might find in an outlying Empire village. Of course, the techniques in this article are not limited to just scenery for Warhammer games, but could be used for any suitable period – ancients or Napoleonic games, for example. Over to you!